Hoboken Brownstone: Basement Slab
On the last post, I talked about digging out the basement. Test holes showed that we could gain an additional 6" in ceiling height if we aligned the top of the new slab with the top of the existing footing. If we went deeper, we would have to underpin the foundation or create a new foundation ledge, which would have been obtrusive and taken up space.
Digging out also allowed more room for gravel and insulation under the slab. The gravel gives us the drainage needed should there be collected moisture under the slab. As you may have heard, a lot of Hoboken is under water during big storms so we also included a sump pump that's connected to the underslab perimeter drainpipe. This photo shows the preparations before the slab pour. The PVC pipe and plywood form to the right is for the sump pump and will be located in the future mechanical room.

Typically we'd call for at least 4" of rigid insulation but given the limited depth we gained, the best we could do was a blanket thickness. We used Insul-tarp, which claims a 7.5 R-value. We needed something since we didn't want to loose our radiant heat through the ground. But even if you don't have radiant, all basement slabs need to be insulated... as you can lose over 20% of your room heat through the ground!
The grid laid over the insulation is the reinforcing that will sit within the slab. At the far end of the basement you can see the bright orange tubing for the radiant heat over the reinforcing grid. We chose to put the tubing within the slab to limit additional thickness needed if we had put it in a subfloor above the slab.


Because we lowered the slab elevation we needed to modify the front entry stairs into the basement. We originally hoped to just add another step at the bottom, but in the end we decided to modify all the steps to give them an easier and even rise... and just adding a step would have been tight to the basement door.

Digging out also allowed more room for gravel and insulation under the slab. The gravel gives us the drainage needed should there be collected moisture under the slab. As you may have heard, a lot of Hoboken is under water during big storms so we also included a sump pump that's connected to the underslab perimeter drainpipe. This photo shows the preparations before the slab pour. The PVC pipe and plywood form to the right is for the sump pump and will be located in the future mechanical room.

Typically we'd call for at least 4" of rigid insulation but given the limited depth we gained, the best we could do was a blanket thickness. We used Insul-tarp, which claims a 7.5 R-value. We needed something since we didn't want to loose our radiant heat through the ground. But even if you don't have radiant, all basement slabs need to be insulated... as you can lose over 20% of your room heat through the ground!
The grid laid over the insulation is the reinforcing that will sit within the slab. At the far end of the basement you can see the bright orange tubing for the radiant heat over the reinforcing grid. We chose to put the tubing within the slab to limit additional thickness needed if we had put it in a subfloor above the slab.

Because we were aligning the top of the slab with the existing footing, a wood form was put at the edge. In the photo below, you can see the exposed footing. Later a curb would be poured over the existing footing to clean it up. A compressible fill joint should be provided between the slab and curb to prevent uncontrolled shrinkage cracks. We planned for cabinetry on these perimeter walls to hide the curb.

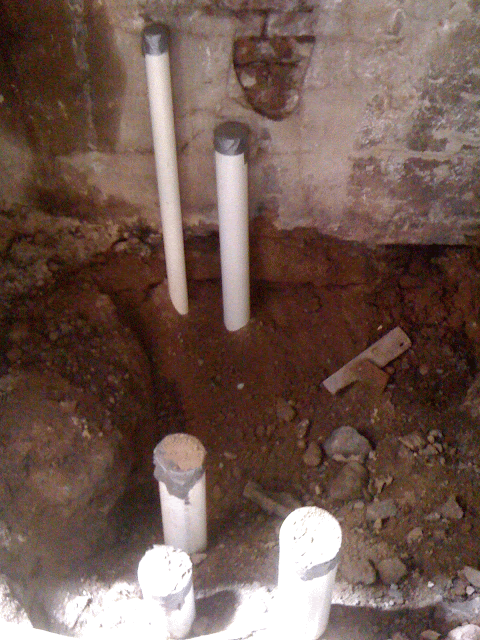
Here are the underground utilities below the stoop. I couldn't tell you what's what, but ultimately they will each be capped with a brass plate level with the slab. New water supply and waste lines were installed. Sanitary and storm water waste are handled separately, each with their own valve. This is a good thing, as you don't want storm water backing up into your basement plumbing fixtures in a big storm!

Because we lowered the slab elevation we needed to modify the front entry stairs into the basement. We originally hoped to just add another step at the bottom, but in the end we decided to modify all the steps to give them an easier and even rise... and just adding a step would have been tight to the basement door.

Well, that's it for slab prep. Next time you'll see the finished concrete and then we'll talk steel!
Well, that's it for slab prep. Next time you'll see the finished concrete and then we'll talk steel!